


ENGINEERING is achieving
function while avoiding failure.
Henry Petroski
SUPPORT VIDEOS etzMAX
In order to help you handling/operating your etzMAX, please watch the following Videos (scroll down).
- Cleaning your etzMAX (3 Videos - please watch all of them)
- Changing between Operating Modes
- Replacing Coneholder
- Adjusting Portfilter Holder
- Adjusting Bean-Blocker Handle
- Adding Shims
- Replacing User Interface
- Calibrating
- Replacing Micro-Macro Adjust
- Replacing Microswitch
- Replacing etzJET and etzJET-plus (grinding mechanism)
- Replacing Loadcell
- Assembly Hopper
These (see below) and more Videos (on how to replace fuse/etzJET-powerboard/powercord/microswitches/..) may be downloaded from our YouTube-channel (Etzinger Grinders) as well.
Make sure, to also consult our Manual, Short Guide and/or read our FAQs.
For more information, please contact your Dealer!
CLEANING
We recommend to clean your etzMAX on a daily basis (if used commercially), especially before longer periods of non-use to avoid for remaining coffee powder to stiffen (and thus causing blockades).
When reassembling, make sure the Adjustment engages properly (without applying force).
Once reassembled, return to your settings. Before filling in the beans, slowly turn the Macro-Ring (with the grinder running) to 0 and back to your settings to ensure for any remains (caught in between) to loosen and fall off.
For more information, please consult the Manual or contact your Dealer.
CLEANING TIP (only OLD coneholders - grinders purchased before March 2021)
If a more thorough cleaning is required (after a blockade), please proceed as per this Video.
When reassembling, make sure the Adjustment engages properly (without applying force).
Once reassembled, return to your settings. Before filling in the beans, slowly turn the Macro-Ring (with the grinder running) to 0 and back to your settings to ensure for any remains (caught in between) to loosen and fall off.
For more information, please consult the Manual or contact your Dealer.
QUICK CLEANING
Tip for a quick clean-up in between (filmed w/ W-version) to ensure for remains of coffee powder not to stiffen up.
For more information, please consult the Manual or contact your Dealer.
CHANGING between OPERATING MODES
Your weight-based etzMAX may be operated in 3 different modes.
To switch from weight-based to time-based mode (and vice versa), press STOP and 1 simultaneously (for at least 5 seconds).
To switch from weight-based or time-based mode to Manual Weighing (Scale) mode (and back), press STOP for at least 5 seconds.
For more information, please consult the Manual or contact your Dealer.
REPLACING CONEHOLDER (Plastic to Metal)
Plastic Coneholders are wear parts and should be replaced when worn so not to cause damage to the system. When reassembling after replacing coneholder (or after cleaning), make sure for the Adjustment to engage properly before returning to your previous settings. Check again, if after reassembling, grinding requires a (much) coarser setting than before. Do not apply excessive force!
For more information, please consult the Manual or contact your Dealer.
ADJUST your PORTAFILTER HOLDER
To adjust your Portafilter Holder, just move the upper arm up or down by while simultaneously pressing a finger on the back part.
For more information, please consult the Manual or contact your Dealer.
ADJUSTING the BEAN-BLOCKER HANDLE
If your Bean-Blocker-Handle seems slack, please check its position as shown in the Video.
Tools required: Allen Key 2
For more information, please consult the Manual or contact your Dealer.
ADDING SHIMS
Shims are part of every etzMAX-delivery. Shimming depends on use, coffee and preferences. Add as many shims as necessary but as few as possible.
Tools required: Allen Key 5
For more information, please consult the Manual or contact your Dealer.
REPLACING the USER INTERFACE
Tools required: Torx 10, Torx 15
For more information, please consult the Manual or contact your Dealer.
CALIBRATING
We recommend to recalibrate your etzMAX every couple of months and/or after having been moved around a lot.
To calibrate your etzMAX (weight-based), you need a 500g calibration weight (i.g. ACAIA).
For more information consult the Manual or contact your Dealer.
REPLACING the MICRO-/MACRO ADJUST
Please make sure to replace the complete part. Early parts are black/black while the modified ones (available since March 2019) are black/white. When switching from a black/black to a black/white-one, make sure to also replace coneholder.
We recommend settings from Click 3 to 12. Grinding at settings beyond 16 may result in damage to the Micro-/Macro as will turning the Adjustment to coarsest setting (29). Do not apply any force when turning the Adjustment!
For more information, contact your Dealer.
REPLACING the MICROSWITCH
Please use torx 8 for M/PLUS and torx 6 for Light-versions.
We recommend settings from Click 3 to 12. Grinding at settings beyond 16 may result in damage to the Micro-/Macro as will turning the Adjustment to coarsest setting (29). Do not apply any force when turning the Adjustment!
For more information, contact your Dealer.
REPLACING etzJET
When replacing the grinding mechanism unit (=etzJET), make sure to correctly connect and not to jam any cables or bend/break any of the microswitches.
For more information, please consult the Manual or contact your Dealer.
REPLACING of etzJET-plus
Before replacing the grinding mechanism unit (=etzJET-plus), make sure to unplug the grinder. Pay attention to correctly connect cables, not to jam any and/or break/bend any microswitches.
Tool required: Torx 10 and 15
For more information, please consult the Manual or contact your Dealer.
ASSEMBLY of the LOADCELL
Tool required: Torx 6
For more information, please consult the Manual or contact your Dealer.
REPLACING the LOADCELL
When replacing the Loadcell, make sure not to damage the wires. It`s important for the Loadcell not to touch the housing of the grinder.
Tools required: Torx 10 and 25, Tape, Feeler Gauge
For more information, please consult the Manual or contact your Dealer.
ASSEMBLY HOPPER
Tools required: Allen Key 2mm
For more information, please consult the Manual or contact your Dealer.
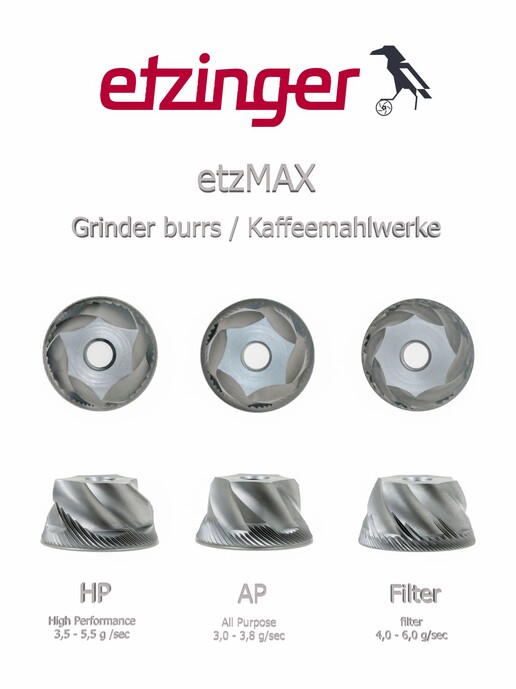
OUR CONE BURRS
Check out our cone burrs to be distinguished by geometry:
HP (High Performance), optimized for medium-dark roasts - recommended for Shops/Restaurants requiring higher speed using mostly the same roast - in case of blockades switch to AP-cone
AP (All Purpose) for all kinds of roast and brew types
FILTER generates less fines


